MENU
Starting a Business
- Best Small Business Loans
- Best Business Internet Service
- Best Online Payroll Service
- Best Business Phone Systems
Our Top Picks
- OnPay Payroll Review
- ADP Payroll Review
- Ooma Office Review
- RingCentral Review
Our In-Depth Reviews
Finance
- Best Accounting Software
- Best Merchant Services Providers
- Best Credit Card Processors
- Best Mobile Credit Card Processors
Our Top Picks
- Clover Review
- Merchant One Review
- QuickBooks Online Review
- Xero Accounting Review
Our In-Depth Reviews
- Accounting
- Finances
- Financial Solutions
- Funding
Explore More
Human Resources
- Best Human Resources Outsourcing Services
- Best Time and Attendance Software
- Best PEO Services
- Best Business Employee Retirement Plans
Our Top Picks
- Bambee Review
- Rippling HR Software Review
- TriNet Review
- Gusto Payroll Review
Our In-Depth Reviews
- Employees
- HR Solutions
- Hiring
- Managing
Explore More
Marketing and Sales
- Best Text Message Marketing Services
- Best CRM Software
- Best Email Marketing Services
- Best Website Builders
Our Top Picks
- Textedly Review
- Salesforce Review
- EZ Texting Review
- Textline Review
Our In-Depth Reviews
Technology
- Best GPS Fleet Management Software
- Best POS Systems
- Best Employee Monitoring Software
- Best Document Management Software
Our Top Picks
- Verizon Connect Fleet GPS Review
- Zoom Review
- Samsara Review
- Zoho CRM Review
Our In-Depth Reviews
Business Basics
- 4 Simple Steps to Valuing Your Small Business
- How to Write a Business Growth Plan
- 12 Business Skills You Need to Master
- How to Start a One-Person Business
Our Top Picks
Table of Contents
To get paid on time, small business owners need a proper invoicing system in place. The easier it is to set up and send invoices, the better your chances of staying on top of accounts receivable. That can make the difference between success and failure. If you don’t know who owes you money and for how long they’ve owed it, your cash flow will take a hit.
That is where PayPal Invoicing comes in. If you run a small business, chances are you have already interacted with the payment company. After all, 377 million people have PayPal accounts. Besides making it easy to accept digital payments, PayPal offers a robust suite of tools for small businesses, and invoicing is one of them. Here is a detailed look at PayPal Invoicing and a step-by-step guide to creating an invoice with this payment provider.
How does PayPal Invoicing work?
PayPal Invoicing is an easy way to create and send invoices. There is no software to download or app to install. You simply take the following steps:
- Log in to your account.
- Click on the “More” button in the upper right-hand corner of the page.
- Select “Create an Invoice” in the drop-down menu.
It is that easy, allowing time-crunched business owners to quickly send an invoice and forget about it. With PayPal, you can create and send invoices from your smartphone, desktop computer or any device that has internet access. Once created, you can send your invoice via shared link or email. You also have the option to print out a PDF and mail it to your customers.
If you’re looking for other solutions to handle your invoicing, check out our recommendations for the best accounting software, many of which have invoicing capabilities.
Here’s a look at some of the other PayPal invoicing features that make it an attractive business tool:
- Customize your invoices. PayPal enables you to customize your invoice template by adding your logo, contact information, billing terms and other custom fields. You can save an invoice as a template to speed up the invoice process the next time. PayPal allows you to save up to 50 templates. PayPal invoicing also allows you to better manage accounts receivables by viewing billing history, tracking payments from customers, and sending alerts and reminders when invoices go unpaid.
- Accept payments. Customers who receive a PayPal invoice from you can pay directly via a debit card, credit card or PayPal account. You don’t need to have a PayPal account to accept payments from clients. PayPal claims invoices sent through its platform are paid on average in less than three days. Close to 80% of invoice payments arrive in one day of sending the invoice. Once a customer pays the invoice, the money is deposited into your PayPal account – in most cases, within minutes. You can use your balance where PayPal is accepted, make transactions with a PayPal debit card, or have the money transferred to your banking account. PayPal charges 1% of the total amount for instant transfers, up to $10. Standard transfers to a linked bank account are free. You can also offer PayPal Credit to eligible customers. With PayPal Credit, you get paid immediately, but the customer can pay off their balance in installments.
Editor’s note: Looking for the right accounting software for your business? Fill out the below questionnaire to have our vendor partners contact you about your needs.
Want to learn more about PayPal’s credit card processing services? Check out our review of PayPal.
- Set up multiple invoices. For business owners who have multiple customers paying the same price for goods and services, PayPal makes it easy to send multiple invoices at once. You can send the same invoice to as many as 100 customers. Enter all email addresses in the “Bill To” field, and PayPal sends a separate payable invoice to each customer. You can also set up recurring invoices to send weekly, monthly, annually or whatever frequency you want.
- Send quick invoices. The sooner you send an invoice, the faster you’re apt to get paid. If you want to bill customers on the spot, you can use PayPal’s quick invoice feature, which lets you send invoices from your mobile device.
How to create and send invoices via PayPal
You can create and send invoices with PayPal in a few simple steps.
Step 1: Create a PayPal business account.
If you want to do more than create and print invoices, you’ll need a PayPal business account. It is free and easy to set up. To start, visit PayPal’s homepage and select the “Business” tab at the top. It will take you to the PayPal business page. Click on the “Getting Started” button, and you’ll be prompted to create an account.
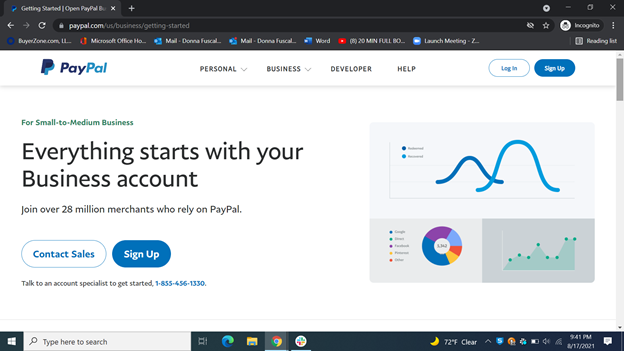
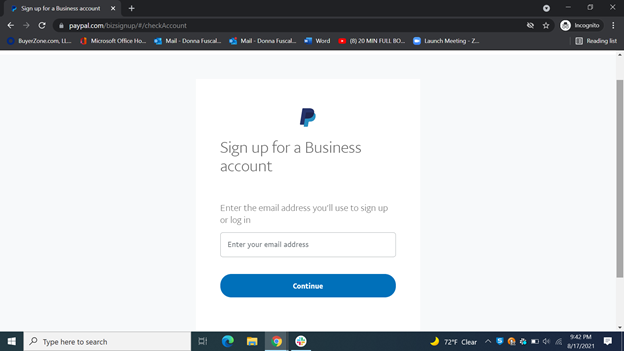
You’ll be required to provide information about your business, including its name, address and phone number. It will also ask you the type of business, monthly sales figures, and whether you want to sign up for its PayPal Business debit MasterCard.
Once the account is created, PayPal asks about your sales and what you want to use PayPal for. Click on “Send Invoices and Estimates,” and it will offer up its relevant apps and a button to set up the tools.
If you don’t want to share information about your business, PayPal Invoicing isn’t for you. While the service is free, the payment provider does require you to offer some information.

Step 2: Create an invoice.
Once you create your free PayPal business account, select the “Get Paid” tab at the top of the screen. That will open a drop-down menu. Select “Create & Manage Invoices.”
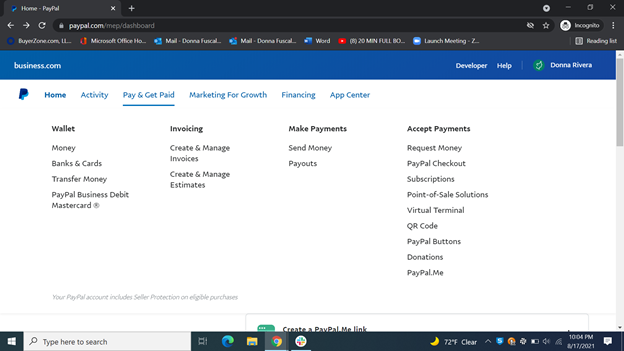
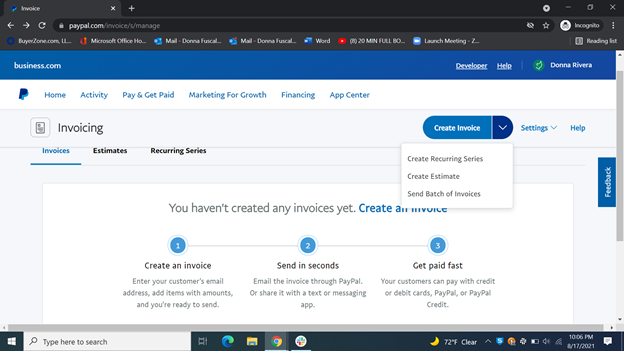
Click on that, and it will open up the main invoice page. At the top, there are three options: Invoices, Estimates and Recurring Series. To create your first business invoice, click on the “Create Invoice” link on the right-hand side of the page.
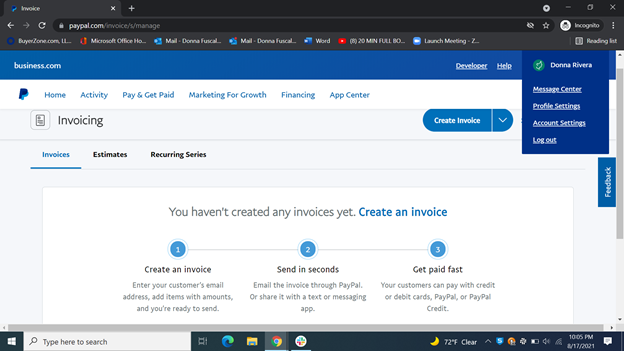
The drop-down menu to the right of the “Create Invoice” tab gives you three choices: Create Recurring Series, Create Estimate and Send Batch of Invoices. For this guide, we are creating one invoice.
Step 3: Input customer information.
Once you click on “Create Invoice,” input your customer’s information, including who is being billed, the amount being billed for, the due date, any discounts, shipping costs, and taxes. You’ll see clickable links to send the invoice to multiple clients and customize the fields. There is also a payment field. You can give customers the option to make partial payments and set a minimum amount due.

You can also add other instructions and upload files and attachments under the “More Options” tab.
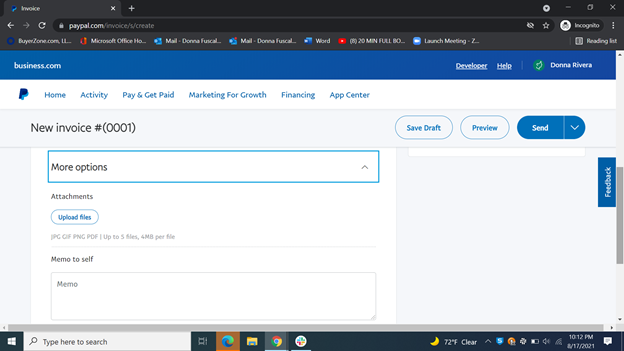
Once you have completed filling out the invoice information, save a draft.
Step 4: Preview your invoice.
After you fill out the invoice, preview it to make sure it is accurate and free of errors. You’ll see what your customers will receive.
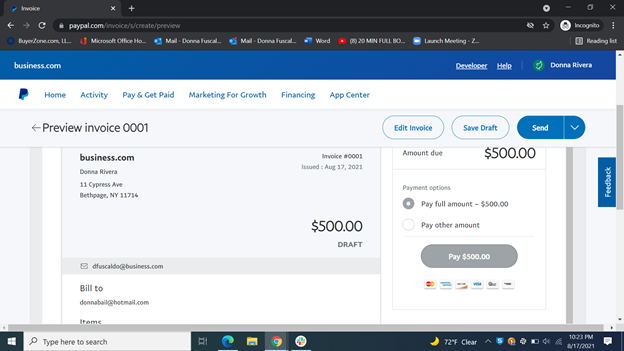
Don’t skip the preview step. The last thing you want to do is send out an invoice riddled with errors or showing the wrong amount.
Step 5: Send your invoice.
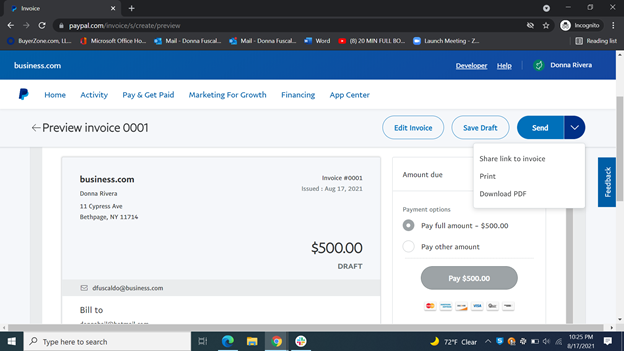
Once you preview your invoice, you have several options. You can edit it, save a draft or send it by email. You also have the option to create a share link, print it, or download a PDF, which you can then mail on your own.
Once the invoice is sent, PayPal confirms it went through with a green message at the top of your screen.
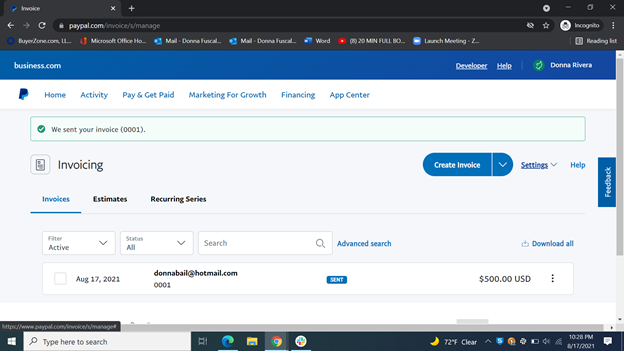
For small business owners that want to set up recurring invoices or send them to multiple clients at once, it pays to add all your customers to the address book in PayPal first. That speeds up what is already an easy process.
How much does PayPal Invoicing cost?
It is free to create and send invoices with PayPal. You’ll pay fees when your invoices get paid online. PayPal charges 3.49% + $0.49 per domestic transaction. If your customer pays you $100, PayPal gets $3.98 of that amount.


