MENU
Starting a Business
- Best Small Business Loans
- Best Business Internet Service
- Best Online Payroll Service
- Best Business Phone Systems
Our Top Picks
- OnPay Payroll Review
- ADP Payroll Review
- Ooma Office Review
- RingCentral Review
Our In-Depth Reviews
Finance
- Best Accounting Software
- Best Merchant Services Providers
- Best Credit Card Processors
- Best Mobile Credit Card Processors
Our Top Picks
- Clover Review
- Merchant One Review
- QuickBooks Online Review
- Xero Accounting Review
Our In-Depth Reviews
- Accounting
- Finances
- Financial Solutions
- Funding
Explore More
Human Resources
- Best Human Resources Outsourcing Services
- Best Time and Attendance Software
- Best PEO Services
- Best Business Employee Retirement Plans
Our Top Picks
- Bambee Review
- Rippling HR Software Review
- TriNet Review
- Gusto Payroll Review
Our In-Depth Reviews
- Employees
- HR Solutions
- Hiring
- Managing
Explore More
Marketing and Sales
- Best Text Message Marketing Services
- Best CRM Software
- Best Email Marketing Services
- Best Website Builders
Our Top Picks
- Textedly Review
- Salesforce Review
- EZ Texting Review
- Textline Review
Our In-Depth Reviews
Technology
- Best GPS Fleet Management Software
- Best POS Systems
- Best Employee Monitoring Software
- Best Document Management Software
Our Top Picks
- Verizon Connect Fleet GPS Review
- Zoom Review
- Samsara Review
- Zoho CRM Review
Our In-Depth Reviews
Business Basics
- 4 Simple Steps to Valuing Your Small Business
- How to Write a Business Growth Plan
- 12 Business Skills You Need to Master
- How to Start a One-Person Business
Our Top Picks
Table of Contents
Images matter. Whether you’re running a website or using social media, consumers love images – no matter which type of device they’re using. If a website uses poor image quality or its pages take too long to load because the image files are too big, some consumers will immediately be turned off. Conversely, quality images that load quickly can enhance a brand’s reputation.
Your business needs to know the basics of image sizing and editing. You don’t need to be a graphic design expert; resizing images and compressing photos is something everyone can easily learn.
One alternative to shooting, editing and compressing your own images is using stock images, but the problem with stock photography is that it can hurt your brand if misused. Learn the best ways to use stock photos for your business to ensure success.
What is photo compression?
Photo compression, or image compression, is a process that reduces an image’s file size so that it takes up less memory in your computer without downgrading the image’s quality too much. Compressing photos is not an overly complicated process, and it’s a good way to save computer memory.
Why do we need image compression?
Compressing photos saves space on your computer and makes them easier to email or post on the web, as the photos will take up less memory. Compression is a helpful tool, especially if you need to alter an image for your website or a social media marketing post. Since it’s not too difficult to compress photos, there’s no reason to shy away from the process due to initial lack of knowledge.
Image optimization is a best practice for posting images online, and compressing them to reduce file size is one popular way to optimize images.
How to compress photos
Photo compression takes just a few steps and can be done using a variety of software. If you don’t know how to compress photos, here are the steps using different types of software. Even small business owners or entrepreneurs who rarely use computers can figure out how to compress image files.
Compressing photos using Photoshop
If you’re looking for photo-editing software, there are dozens of quality options. You can use advanced platforms like Adobe Photoshop or the simplified, less expensive versions like Adobe Photoshop Elements to perform image edits.
If you’ll only use photo-editing software to compress or resize a few images, don’t pay for a service like Photoshop when you can use a free option like the GNU Image Manipulation Program, better known as GIMP. These free alternatives tend to be well regarded and should be simple enough for new users to pick up.
Follow these steps to compress your images using Photoshop.
- Open the image you want to compress in Photoshop.
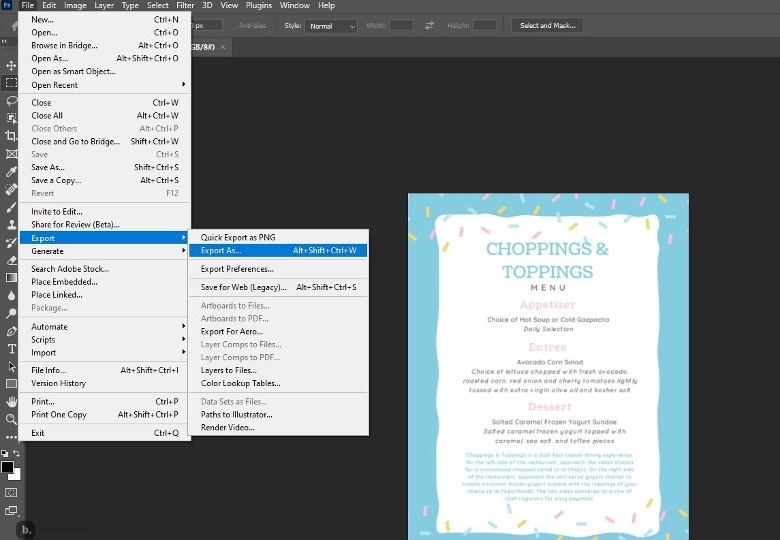
You’ll go to “Export” and then “Export As” to start the compression process.
- Go to the file menu in your software and choose Export As…
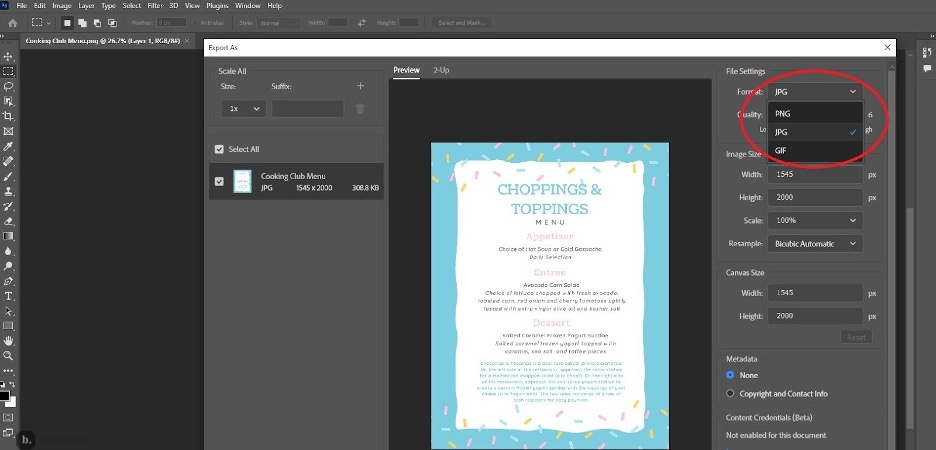
To compress the image, you want to change the file type to “JPG.”
- Click on JPG as your file type in the pop-up menu.
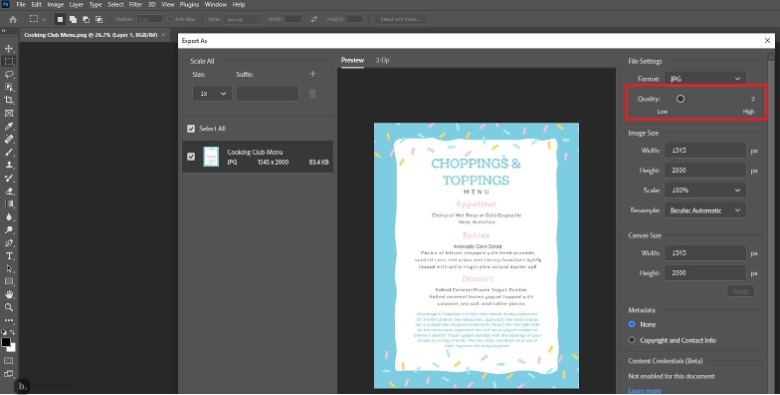
Moving the “Quality” slider to the left will reduce the file size.
- Move the “Quality” slider to the left to compress the image.
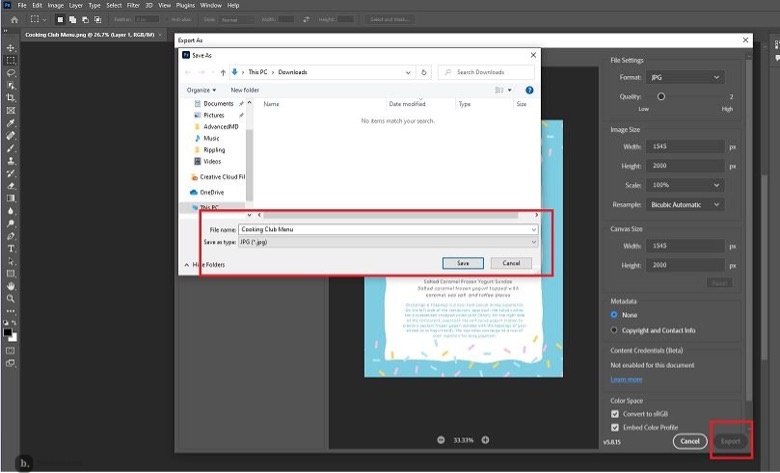
Once you export the compressed image and save it, you can use it for other things.
- Click Export and save the compressed image.
Image editing can be tricky at times, so it’s a good practice to save an original copy in case something goes wrong during the process. It’s never a bad idea to use a duplicate image to make changes.
If you are afraid of messing up the original photo, always use Save As to create a compressed version that is separate from the original. Then, if you ever need the original version, you’ll have it saved.
Compressing photos using Microsoft Word
Microsoft Word is another option for image compression. Follow these steps to compress your images using Microsoft Word:
- Open Microsoft Word and open a new Word document.
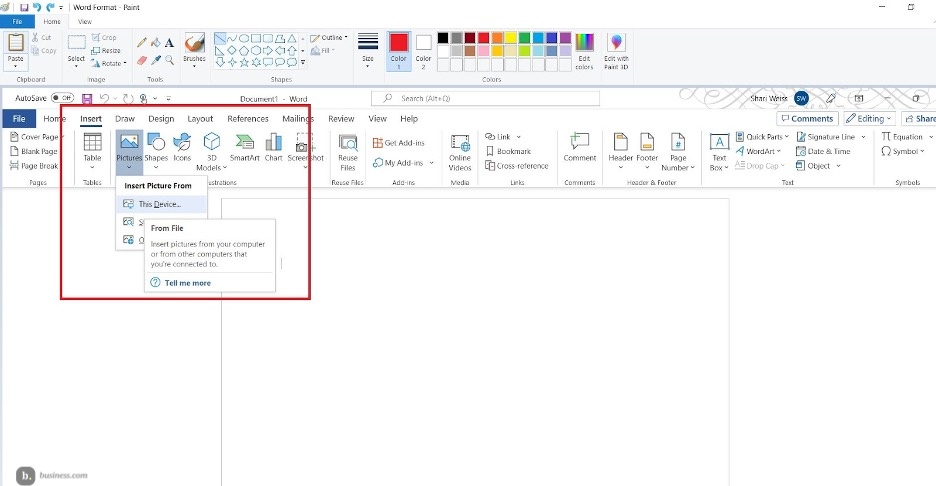
You need to insert the image into your Word document before you can compress it.
- Click on the Insert tab on the top left side of the screen.
- Choose the Pictures icon from the list of choices and then select This Device.
- A list of files on your computer will pop up. Select the picture file you want to compress by double-clicking on it. The picture will be added to your document.
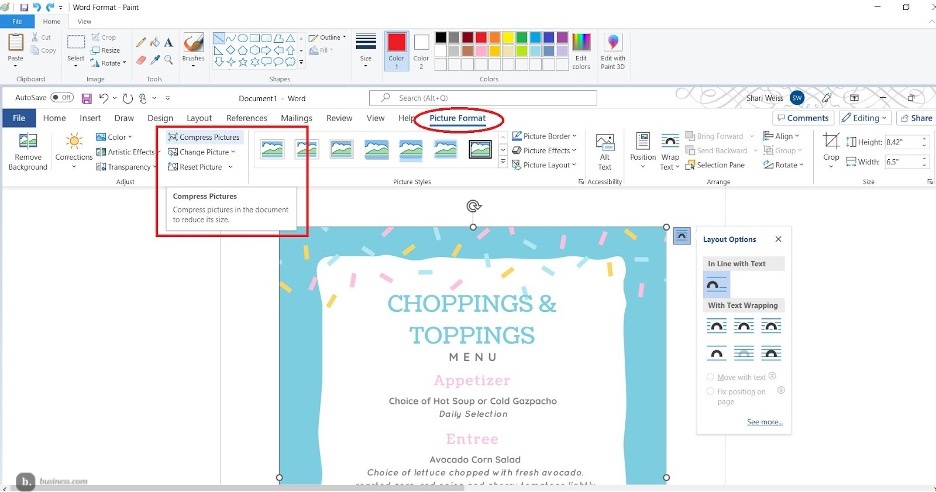
After going to the “Picture Format” tab, you’ll see the option to compress the image.
- Click on the picture. Under Picture Tools, select the Picture Format In the Adjust group, choose Compress Pictures.
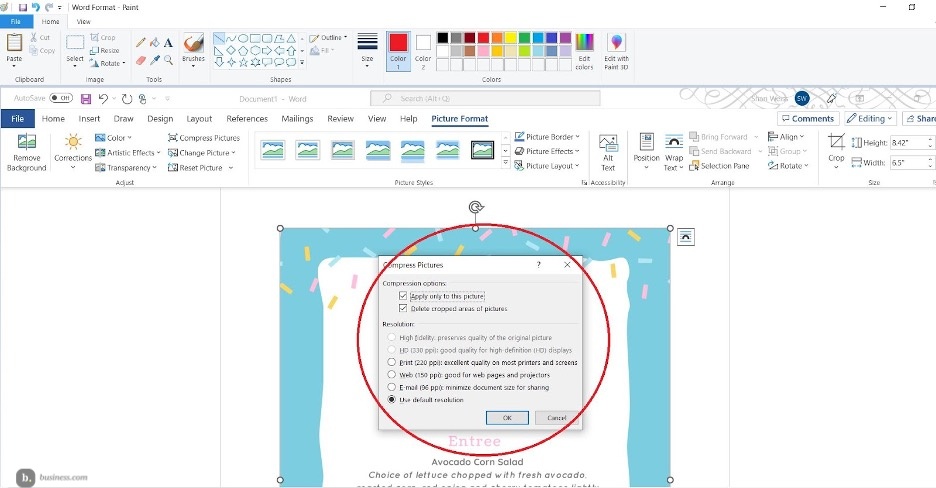
You can choose your desired resolution for compression.
- A pop-up screen will give you options. Either click OK to accept the default resolution or choose the quality of the photo compression by ticking the box beside the option you want and then press OK.
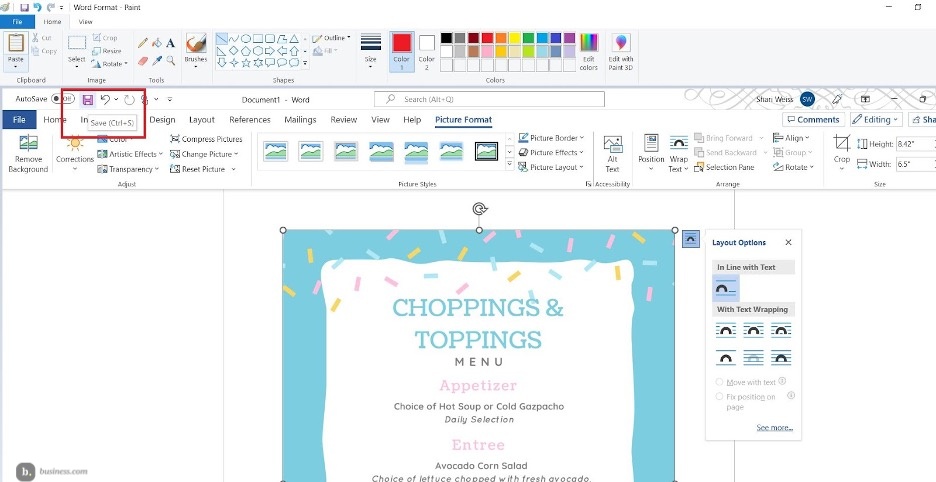
Remember to save the file for the compression to be official.
- Save your document and the photo will compress.
If you just want the photo to appear in the document without a lot of white space around it, then you will need to change the size of your document to the size of your photo, or as close to the same size as you can get. Here’s how to do that:
- Go to the Layout tab at the top of the Microsoft Word screen.
- Click on the Size icon from the Page Setup group.
- Select your custom paper size.
- Save your document.
Compressing photos on a smartphone
If the images you need to compress are already saved on your smartphone, you can use mobile editing apps like Instasize to compress them. Open the photo, edit the image according to your preferences, and save the photo back to your phone’s gallery. The saved image will come in a smaller image file size, and you’ll be able to play around with filters, borders and stylized text in one go.
Compressing a JPEG file
Whether you’re using a JPEG or any other image file, the process to compress the image should remain largely the same, but with JPEG files, you risk losing resolution when you compress images. If the image is large, you can use Microsoft Paint to resize the image, which should reduce the file size as well.
- Open the image in Microsoft Paint.
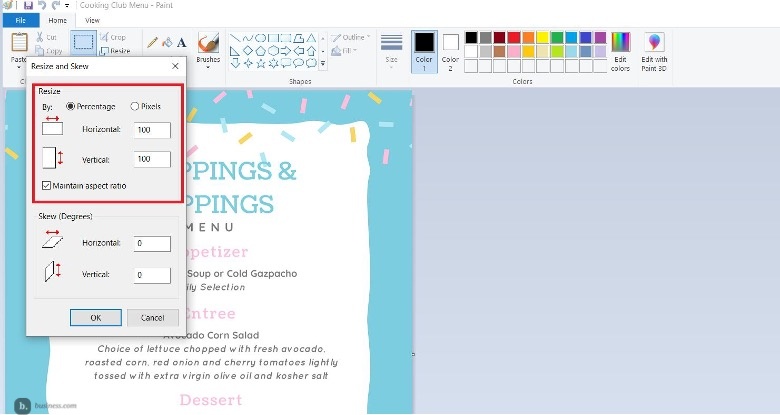
You can choose the dimensions you want for your resized image.
- Select the image and use the Resize Input whatever image dimensions you like and keep the Maintain aspect ratio box checked.
- Click OK and the image will resize.
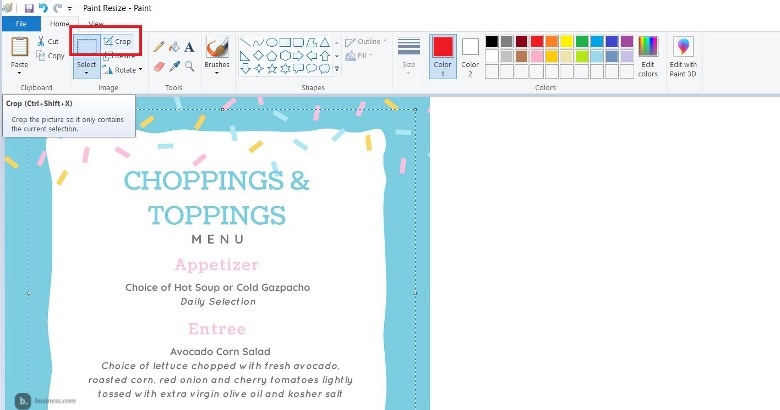
After you resize the image, you can also opt to crop it.
- If you want to crop the image, use the Select button to choose the portion of the image you want to keep, then click Crop.
- Save the image.
You can also compress a JPEG file using some of the other methods we shared above. It depends on your preference and your business’s software capabilities. Compressing JPEG images isn’t rocket science, and platforms like Photoshop, Word and Paint can all get the job done.
Photo compression FAQs
Want to know more about photo compression? Here are some common questions.
What are the two types of compression?
Photo compression can be lossy or lossless. Lossy compression is commonly found with JPEG images, and it removes some of the file’s original data to result in a smaller file size. Lossless compression, such as ZIP files, doesn’t reduce the quality of the file, but it also doesn’t reduce the file size as much as lossy compression.
How does photo JPEG compression affect image quality?
When you compress an image, the compressed version contains less file information. This can reduce the quality of certain photo details such as color, sharpness and contrast. Saving photos in a compressed format such as JPEG also reduces the memory space each photo takes up.
Can you uncompress a JPEG?
No. If you compress a JPEG file, you will not be able to regain its quality by converting the file back to its original lossless form. Instead, it is advised that you save a separate copy of the original file if you wish to keep its original quality.
Skye Schooley contributed to the writing and research in this article.


